I have
previously documented a way to add lookup filtering capability to MSCRM4 "Add Existing..." button in a CRM N:N view. There was
a question in the blog post today about whether this is possible in CRM 2011. So here is this blog post that will walk you through the implementation process.
Prerequisites
To go through the customizations in this blog post, you need to understand how CRM ribbon customization works, and also you need to know how to work with CRM Web Resources and solution export/import functionalities. It should also be noted that this blog post uses CRM Developer Toolkit. In case you are not familiar with the toolkit, you can have a look at
my another blog post that illustrates some typical development scenarios which you might find useful. This blog post might be able to demonstrate you how the toolkit can help improve your productivity when developing CRM scripts.
Business Scenario
Let's say we have a custom entity called Project, which has a many-to-many relationship to CRM account entity. In Project entity form, I added a sub-grid which points to account entity, as shown below.
In the above screen, we have a Add Existing Button when the sub-grid is selected. When the button is clicked, we will be prompted the lookup entity's default Lookup View, as shown below.
What we are trying to achieve is to add some filtering capability to the "Add Existing ..." button so CRM only shows the account records that we are interested.
Let's get started.
Steps
Step 1: Create CRM JavaScript Web Resources
- In Visual Studio 2010, create a CRM project. (Please refer to the blog post that I just mentioned for detailed instructions about how to do this)
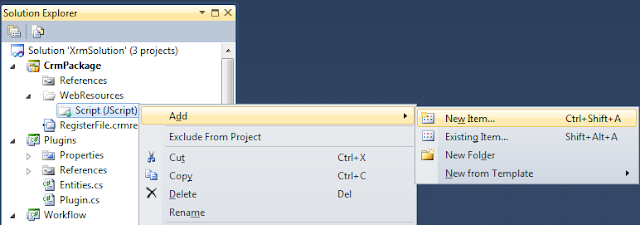
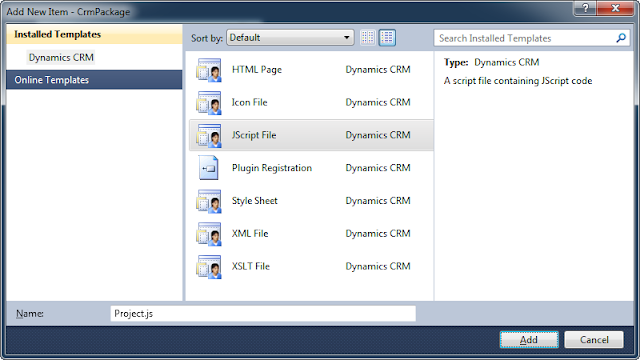
- In CrmPackage project, right-click WebResouces –> Script (JScript), and choose "Add" –> "New Item" to create a new JavaScript file. Let's call the file Project.js.
- Add the following script to the JS file (I borrowed the fetchXml and layoutXml combination from SDK document).
function addExistingFromSubGridCustom(params) {

    var relName = params.gridControl.getParameter("relName"),
        roleOrd = params.gridControl.getParameter("roleOrd"),
        viewId = "{00000000-0000-0000-0000-000000000001}"; // a dummy view ID

    var customView = {
        fetchXml: params.fetchXml,
        id: viewId,
        layoutXml: params.layoutXml,
        name: "Filtered Lookup View",
        recordType: params.gridTypeCode,
        Type: 0
    };

    var lookupItems = LookupObjects(null, "multi", params.gridTypeCode, 0, null, "", null, null, null, null, null, null, viewId, [customView]);
    if (lookupItems && lookupItems.items.length > 0) {
        AssociateObjects(crmFormSubmit.crmFormSubmitObjectType.value, crmFormSubmit.crmFormSubmitId.value, params.gridTypeCode, lookupItems, IsNull(roleOrd) || roleOrd == 2, "", relName);
    }
}

function addExistingFromSubGridAccount(gridTypeCode, gridControl) {
    addExistingFromSubGridCustom({
        gridTypeCode: gridTypeCode,
        gridControl: gridControl,
        fetchXml: "<fetch version='1.0' " +
                       "output-format='xml-platform' " +
                       "mapping='logical'>" +
                   "<entity name='account'>" +
                   "<attribute name='name' />" +
                   "<attribute name='address1_city' />" +
                   "<order attribute='name' " +
                           "descending='false' />" +
                   "<filter type='and'>" +
                       "<condition attribute='ownerid' " +
                                   "operator='eq-userid' />" +
                       "<condition attribute='statecode' " +
                                   "operator='eq' " +
                                   "value='0' />" +
                   "</filter>" +
                   "<attribute name='primarycontactid' />" +
                   "<attribute name='telephone1' />" +
                   "<attribute name='accountid' />" +
                   "<link-entity alias='accountprimarycontactidcontactcontactid' " +
                                   "name='contact' " +
                                   "from='contactid' " +
                                   "to='primarycontactid' " +
                                   "link-type='outer' " +
                                   "visible='false'>" +
                       "<attribute name='emailaddress1' />" +
                   "</link-entity>" +
                   "</entity>" +
               "</fetch>",
        layoutXml: "<grid name='resultset' " +
                             "object='1' " +
                             "jump='name' " +
                             "select='1' " +
                             "icon='1' " +
                             "preview='1'>" +
                         "<row name='result' " +
                              "id='accountid'>" +
                           "<cell name='name' " +
                                 "width='300' />" +
                           "<cell name='telephone1' " +
                                 "width='100' />" +
                           "<cell name='address1_city' " +
                                 "width='100' />" +
                           "<cell name='primarycontactid' " +
                                 "width='150' />" +
                           "<cell name='accountprimarycontactidcontactcontactid.emailaddress1' " +
                                 "width='150' " +
                                 "disableSorting='1' />" +
                         "</row>" +
                       "</grid>"

    });
}
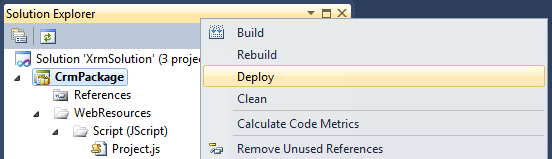
- After the script has been saved, you can right click CrmPackage project in Visual Studio Solution Explorer window, and choose "Deploy" to deploy the script to CRM Server. In our case, we will have a Web Resource in CRM called new_Project.
Step 2: Customize CRM Ribbon to Hook up the JS Function
- In CRM, create a new solution, and add account entity (the entity in the sub-grid) to the solution.
- Export the solution to a .zip file, and extract the file somewhere in your local file system.
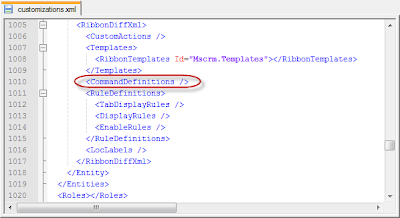
- Open the customizations.xml from the extracted file, and locate RibbonDiffXml section in the file, under the account entity.
      <RibbonDiffXml>
        <CustomActions />
        <Templates>
          <RibbonTemplates Id="Mscrm.Templates"></RibbonTemplates>
        </Templates>
        <CommandDefinitions />
        <RuleDefinitions>
          <TabDisplayRules />
          <DisplayRules />
          <EnableRules />
        </RuleDefinitions>
        <LocLabels />
      </RibbonDiffXml>
- What we need to change is the CommandDefinitions part, which we can get the template code from applicationribbon.xml file (or <entityname>ribbon.xml if it's a system entity) in CRM SDK's resources\exportedribbonxml folder.
- In applicationribbon.xml file (or <entityname>ribbon.xml), locate <CommandDefinition Id="Mscrm.AddExistingRecordFromSubGridAssociated"> line (You can search by addExistingFromSubGridAssociated to get there).
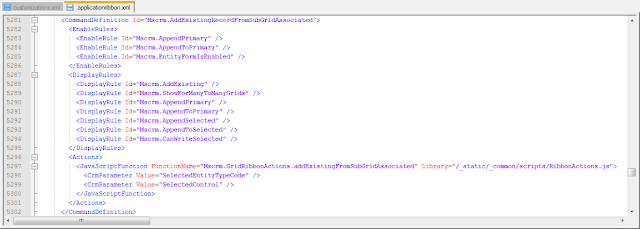
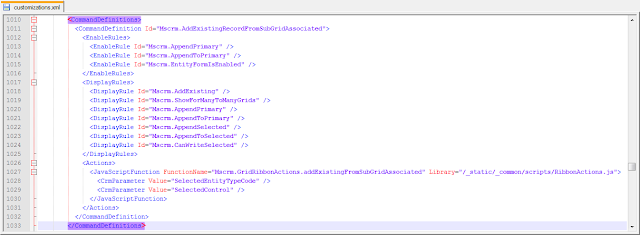
- Copy the xml content under <CommandDefinition Id="Mscrm.AddExistingRecordFromSubGridAssociated"> (including itself and its closing tag as well) to the customizations.xml file, so it should look like this.
- Modify the JavaScriptFunction part to point to the custom JS function that we previously developed, so it should be something like this:
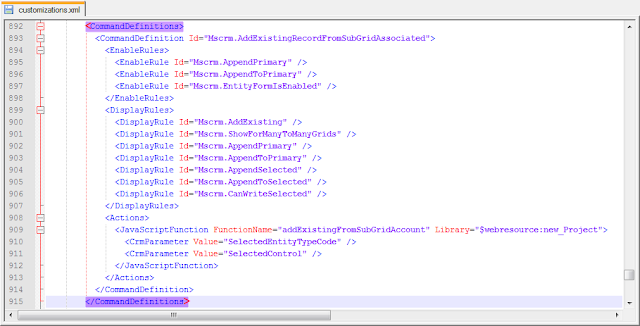
The following is the final customization xml.
  <CommandDefinition Id="Mscrm.AddExistingRecordFromSubGridAssociated">
    <EnableRules>
      <EnableRule Id="Mscrm.AppendPrimary" />
      <EnableRule Id="Mscrm.AppendToPrimary" />
      <EnableRule Id="Mscrm.EntityFormIsEnabled" />
    </EnableRules>
    <DisplayRules>
      <DisplayRule Id="Mscrm.AddExisting" />
      <DisplayRule Id="Mscrm.ShowForManyToManyGrids" />
      <DisplayRule Id="Mscrm.AppendPrimary" />
      <DisplayRule Id="Mscrm.AppendToPrimary" />
      <DisplayRule Id="Mscrm.AppendSelected" />
      <DisplayRule Id="Mscrm.AppendToSelected" />
      <DisplayRule Id="Mscrm.CanWriteSelected" />
    </DisplayRules>
    <Actions>
      <JavaScriptFunction FunctionName="addExistingFromSubGridAccount" Library="$webresource:new_Project">
        <CrmParameter Value="SelectedEntityTypeCode" />
        <CrmParameter Value="SelectedControl" />
      </JavaScriptFunction>
    </Actions>
  </CommandDefinition>
Note that your JS webresource name could be in different format. You can find out that by openning the web resource in CRM, which tells you the path to the web resource file.
- Save the file, and zip it back to the original solution export file.
- Import the solution file, and publish changes. If everything goes OK, you will see a filtered lookup like the following.

Final Notes
- This is an unsupported customization, since we are using undocumented CRM built-in JS functions.
- addExistingFromSubGridCustom function is a re-usable function which is what you really need. addExistingFromSubGridAccount function is the actual one that's going to be called in your ribbon command button's customization.
- The filter that I have implemented didn't use any context information (such a field value) on the CRM form, you can easily add this in the function when constructing the fetchXml string, if desired.
- The above change will apply to all account subgrid regardless of the hosting entity. It should be possible to handle it differently by getting some context information from the form, or probably pass some extra information to the function.
- The code didn't have much comments, but hopefully the sample has provided enough information for you to start with.
By the way, an off-topic note, this blog has just reached 100K page views today. It took
almost two years to reach 50K pageviews last time, but it only takes a few months to reach another one, although I don't currently produce as many posts as I did in the beginning of my blogging adventure. Good to see the growth of the CRM community.
Hope this helps.


